Published
Gantt Chart Tutorial in Microsoft Excel 2013
Excel Gantt Chart Tutorial
Gantt Chart Tutorial
How to Make a Gantt Chart
In this tutorial we will show you how to create a Gantt Chart using Excel. Excel doesn't actually have a default Gantt Chart, therefore we will modify a bar chart to turn it into a Gantt Chart.
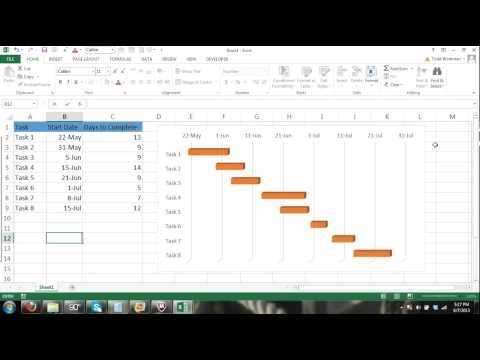
Step 1: First we need to enter our data such as the tasks, the start date, days completed and days remaining. See the image below and enter your data exactly as shown in the image.
how to create a gantt chart in Microsoft Excel
We did not enter an end date because the days completed and days remaining provide the end date through simple arithmetic.
Step 2: After entering your data into the cells, you can start building your Gantt Chart.
1.Click the insert tab on the ribbon.
2.Now select the bar Bar Chart command in the Charts group and select the Stacked Bar Chart as shown in the image below.
After you have clicked on the stacked sideways bar chart a blank chart should show up.
how to create a gantt chart using Microsoft Excel
Step 3: Right click on the blank chart and select data.
gantt chart excel
The Select Data Series dialog will appear. Click Add Series and the Edit Series dialog box will appear. In the Series Name box name this series "Start Date" and for Series Value select all the dates listed under Start Date in your Excel Sheet. Then click OK! See the image below.
gantt chart excel tutorial
Step 4: After clicking OK in the Start Date Series box the Select Data Source" box will appear again.
Click Edit under the Horizontal (Category) Axis Label and the Axis Label box will appear. In this box you will enter the tasks. To do this simply select inside the box, then press control and select all the tasks in the Excel Sheet. See the image below for assistance.
excel tutorial gantt chart
Excel Tutorial How to Create a Gantt Chart
Step 5: Right click on the chart again. Select Data and add a new series. This time you will add the "days completed" to the chart. You will do the same thing you did for the start date. Enter "Days completed" in the Series Name and select all the cells (even the cell without content) listed under Days Complete. See Below.
how to create a Gantt Chart in Excel
Step 6: Now we will add another series to the chart for the Days Remaining column the same way we did the Start Date Series and the Days Completed Series. Step 7: In this step we will hide the Start Date Bars because they are not needed for visual purposes in our Gantt Chart. To do this: 1.Right click on the Start Date bars and select Format Data Series in the shortcut menu.
2.The Format Data Series dialog box will appear. In this box click on the Fill tab and the click the No Fill button & press OK
how to create a gantt chart in Excel
Step 8: Two problems should be obvious. Our tasks are in reverse order and there is a gap showing dates before the project's start date that we don't need.
First let's get our task in the correct order! 1.Right click the task on the chart and click format axis. Then you should see Axis Options here you will select the categories in reverse order box.
excel for noobs
Step 9: Now that our tasks are in the correct order, we need to remove the gap before the official start date. To do this you must understand how Excel recognizes dates.
1. Copy the earliest date under the start date part of your sheet and paste it into another cell off to the right. See below.
excel for noobs gantt chart tutorial
2.Now change the number format to general and take note of that number.
3. Now right click on the dates, in the axis options click on "Minimum Fized and enter the number that the earliest date was converted to.
We now have a complete Gantt Chart. We can update the days completed and remaining and the Gantt Chart will automatically correct itself.
Excel Gantt Chart Tutorial
Gantt Chart Tutorial
How to Make a Gantt Chart
In this tutorial we will show you how to create a Gantt Chart using Excel. Excel doesn't actually have a default Gantt Chart, therefore we will modify a bar chart to turn it into a Gantt Chart.
Step 1: First we need to enter our data such as the tasks, the start date, days completed and days remaining. See the image below and enter your data exactly as shown in the image.
how to create a gantt chart in Microsoft Excel
We did not enter an end date because the days completed and days remaining provide the end date through simple arithmetic.
Step 2: After entering your data into the cells, you can start building your Gantt Chart.
1.Click the insert tab on the ribbon.
2.Now select the bar Bar Chart command in the Charts group and select the Stacked Bar Chart as shown in the image below.
After you have clicked on the stacked sideways bar chart a blank chart should show up.
how to create a gantt chart using Microsoft Excel
Step 3: Right click on the blank chart and select data.
gantt chart excel
The Select Data Series dialog will appear. Click Add Series and the Edit Series dialog box will appear. In the Series Name box name this series "Start Date" and for Series Value select all the dates listed under Start Date in your Excel Sheet. Then click OK! See the image below.
gantt chart excel tutorial
Step 4: After clicking OK in the Start Date Series box the Select Data Source" box will appear again.
Click Edit under the Horizontal (Category) Axis Label and the Axis Label box will appear. In this box you will enter the tasks. To do this simply select inside the box, then press control and select all the tasks in the Excel Sheet. See the image below for assistance.
excel tutorial gantt chart
Excel Tutorial How to Create a Gantt Chart
Step 5: Right click on the chart again. Select Data and add a new series. This time you will add the "days completed" to the chart. You will do the same thing you did for the start date. Enter "Days completed" in the Series Name and select all the cells (even the cell without content) listed under Days Complete. See Below.
how to create a Gantt Chart in Excel
Step 6: Now we will add another series to the chart for the Days Remaining column the same way we did the Start Date Series and the Days Completed Series. Step 7: In this step we will hide the Start Date Bars because they are not needed for visual purposes in our Gantt Chart. To do this: 1.Right click on the Start Date bars and select Format Data Series in the shortcut menu.
2.The Format Data Series dialog box will appear. In this box click on the Fill tab and the click the No Fill button & press OK
how to create a gantt chart in Excel
Step 8: Two problems should be obvious. Our tasks are in reverse order and there is a gap showing dates before the project's start date that we don't need.
First let's get our task in the correct order! 1.Right click the task on the chart and click format axis. Then you should see Axis Options here you will select the categories in reverse order box.
excel for noobs
Step 9: Now that our tasks are in the correct order, we need to remove the gap before the official start date. To do this you must understand how Excel recognizes dates.
1. Copy the earliest date under the start date part of your sheet and paste it into another cell off to the right. See below.
excel for noobs gantt chart tutorial
2.Now change the number format to general and take note of that number.
3. Now right click on the dates, in the axis options click on "Minimum Fized and enter the number that the earliest date was converted to.
We now have a complete Gantt Chart. We can update the days completed and remaining and the Gantt Chart will automatically correct itself.
- Category
- Tech
Sign in or sign up to post comments.
Be the first to comment
Up Next
Autoplay
-
09:13

Excel 2010 Tutorial For Beginners #2 - Enter & Edit Text and Numbers (Microsoft Excel)
-
07:35
Microsoft Excel VLOOKUP Tutorial for Beginners - Office Excel 2003, 2007, 2010
-
31:31
Microsoft Excel 2007 Tutorial Bahasa Indonesia
-
46:18
Microsoft office 2007 tutorial cu word 2007
-
14:27
Microsoft Excel 2013 Training - Formulas And Functions - Excel Training Tutorial
-
02:12
How to Remove Contents From Selected Cells in Microsoft Excel 2007 : MS Excel Tips
-
17:06
Microsoft Excel 2007 2010 Pt 4 (Conditional Format, If Function, Copy/Paste)
-
08:56
Easy Way To Make A Graph On Excel FROM SCRATCH - Excel 2007 Or 2010
-
01:29
Microsoft® Excel 2007: How To Calculate Percentages In Excel
-
06:55
Microsoft Excel Pivot Table Tutorial For Beginners - Excel 2003, 2007, 2010
-
10:48
Excel 2010 Tutorial For Beginners #6 - Number Formats (Microsoft Excel)
-
02:31
How to Repeat Cell Lines at the Top of Each Page in Microsoft Excel 2007 : Using Excel
-
10:50
Word 2016 Mail Merge Tutorial with an Excel Data File (works in Word 2007/2010/2013 as well)
-
13:48
Excel 2010 Tutorial For Beginners #3 - Calculation Basics & Formulas (Microsoft Excel)
-
08:14
Gantt Chart Excel Tutorial - How to make a Basic Gantt Chart in Microsoft Excel 2013
-
1:04:23
Excel 2007 Tutorial - A Comprehensive Guide To Excel For Anyone - Excel Made Easy
-
26:09
Hindi Microsoft Excel 2007/2010/2013 Pt 1
-
13:29
Microsoft Visio 2013 Training Tutorial - How to Create an Org Chart Using Visio 2013
-
29:21
MİCROSOFT EXCEL 2010 GÖRSEL VİDEO EĞİTİMİ -Excel 2010'a Giriş
-
30:13
Tutorial Microsoft Excel 2007
-
06:55
Microsoft Excel 2010 Tutorial - Part 01 Of 12 - Excel Interface 1
-
14:50
Microsoft Access 2013 Tutorial - Creating Forms - Access 2013 Tutorial for Beginners