Published
Watch more How to Make Simple Sugar Paste Flowers videos:
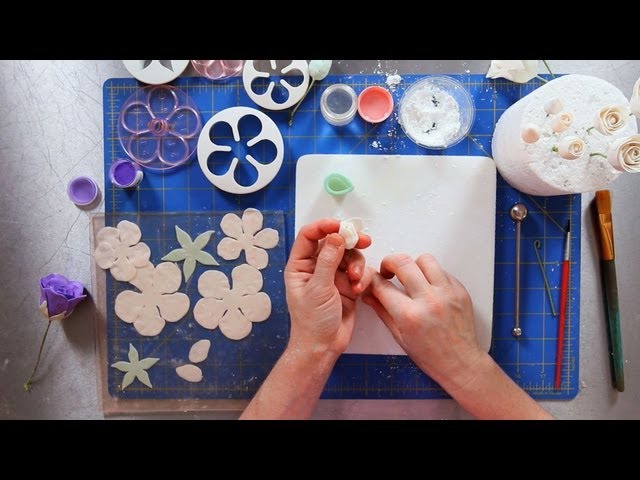
Learn how to add the first layers of petals to a rose sugar flower from cake designer Amy Noelle in this Howcast cake decorating tutorial, part 2 of a 6-part series.
After my center has dried for 24 hours, I'm ready to add the petals. I
first start by rolling out my gum paste and cutting it with a teardrop
cutter. I'm going to add the petals individually. My first layer of petals
has one petal that wraps all the way around. So I've cut out my teardrop
shape. Now I like my petal edges super thin, so I'm going to pinch and
roll. The technique that I use is as if I'm snapping. As if I'm snapping
I'm going to use my first finger and my thumb, and pinch and roll all the
way around. I want to take this teardrop shape and make it as wide as
possible, probably a good inch and a half to two inches wide, so that I can
wrap it all the way around my center. I'll take my center and add a tiny
bit of edible glue, all over. Just brush it on with the little paint brush,
brush all over the center. And I want to wrap it around.
When I start it, I hold it and I push my finger up against it, but I want
to make sure that the petal is just a wee little bit higher than the tip of
my center. I'm going to fold down the edges. I kind of think about this as
folding it like a breast cancer ribbon, where everything overlaps. I take
one piece and fold it down, diagonally to one side, and fold the other down
to the other side. When I finish, I should see a teeny, teeny, tiny bit of
an opening, right here in the middle. And once I have my nice teardrop
shape, I'm ready to add my second layer of petals.
I'm just going to put this aside for one second, while I prepare my
petals. The same I've rolled out my petals, and I've cut them with the same
size teardrop cutter. This teardrop cutter is probably about an inch in
length, but when I'm working it, I do want to also pinch and roll the
edges, just like I did before, in order to make them probably about an inch
and a half or two inches long.
For this layer of petals, I need to have two petals, in order to create my
shapes. Now when I'm creating these shapes, I want to think about them as
making a C and a backwards C. I want to interlock my petals into and around
my center. I'm going to brush on a tiny bit of glue, all the way around the
base. I just want to put a little bit around the base of the petals, not at
the top, because later on I want to be able to paint these, and wherever
the glue is, the paint won't stick.
So I'll adhere the first one. When I put the first one on, I want to find
where the overlap is for my center, and I want to align the center of my
petal right on that spot. I do also want to make sure that this petal is,
at least, this tall, if not taller, than the previous petal, because I
don't want the center of my rose to be sticking out of my flower. I want
it to be a little bit sunken in. If you look at a rose, the petals are a
little bit sunken in.
I'm going to push down, just one side of that petal. Leave the other side
open. And then I can put on overlapping, this second petal. Now, remember,
I want to create that C and backward C shape, so I can push down one side,
but I want to make sure to tuck this side underneath that open layer. And
when I put them on, they kind of just go straight around. Make sure they're
around in a circle, creating a C and a backward C shape. Now I'll push down
on the edge. Because I have glue on here, I'll make sure to load my
fingertips up with powdered sugar so they don't stick too much, and that
will help to absorb some of the glue. I'm going to put this aside, and then
I'm ready to add my third layer of petals.
- Category
- Health
Sign in or sign up to post comments.
Be the first to comment
Up Next
Autoplay
-
03:07

How to Paint & Assemble a Magnolia | Sugar Flowers
-
02:39
How to Add Third Layer of Rose Petals | Sugar Flowers
-
02:00
How to Paint a Peony | Sugar Flowers
-
03:57
How to Add Petals to Rose Bud | Sugar Flowers
-
02:30
How to Attach Orchid Petals | Sugar Flowers
-
01:31
How to Make a Magnolia Center | Sugar Flowers
-
01:39
How to Paint Orchid Petals | Sugar Flowers
-
02:03
How to Make a Rose Water Toner Using Rose Powder : Natural Beauty Tips
-
01:31
Green Tea and Rose Sugar Scrub - Martha Stewart
-
01:45
How to Make an Orchid Center Column | Sugar Flowers
-
03:50
How to Arrange Sugar Flowers on Cakes | Sugar Flowers
-
01:57
About Cake Designer Amy Noelle | Sugar Flowers
-
02:55
How to Make Magnolia Petals | Sugar Flowers
-
02:05
How to Add Outer Labellum to Orchid | Sugar Flowers
-
00:54
DIY Rose Sugar Scrub | Beauty Junkie
-
02:52
How to Add Outer Petals to a Rose | Sugar Flowers
-
01:54
What's More Romantic Than a Rose Petal Cake?!
-
01:52
Diet and Learning - Is sugar poison? Sugar & sugar substitutes
-
01:22
How to Make a Rose Center | Sugar Flowers
-
02:55
How to Make Orchid Petals | Sugar Flowers
-
01:28
How to Make Five-Petal, Decorative Icing Flowers : Captivating Cake Designs
-
01:48
How to Paint a Rose | Sugar Flowers