Published
Watch more How to Make Simple Sugar Paste Flowers videos:
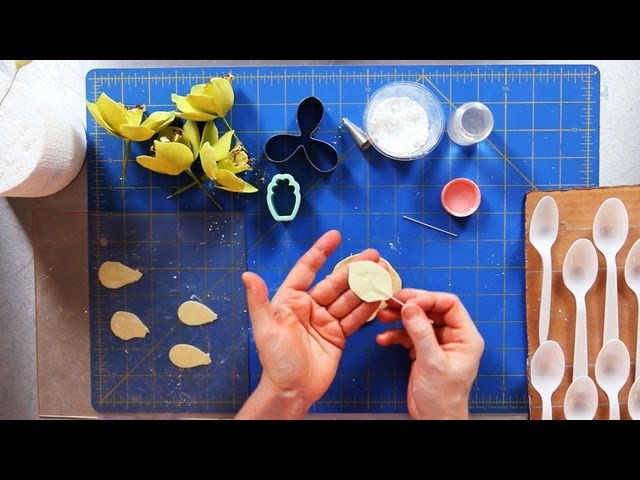
Learn how to make orchid sugar paste flower petals from cake designer Amy Noelle in this Howcast cake decorating tutorial, part 3 of a 5-part series.
Now it's time to create the petals for our Cymbidium orchid. I roll down my
gum paste and I've cut it with a three petal cutter. If you don't have a
three petal cutter, you can always use the small circle cutter, but I have
my three petal cutter, and I'm going to pinch off and separate all three
petals, keeping the two that I'm not using aside until I'm ready to use
them. I keep them underneath plastic so that they don't dry out.
Now I need to individually wire each one of the petals. I'm going to fold
over the end of the petals just so that I get a nice smooth surface to
start. My wire gets dipped into a tiny bit of edible glue, and I brush off
the extra. I'm going to insert in between my two fingers, insert the wire.
It only goes in a teeny, tiny little bit. And then I can taper the petal
back to the wire. At this point, it should look kind of like a balloon on a
stick. Now I believe in having very thin petal edges so the technique that
I use is as if I'm snapping, I'm going to pinch and roll the edges all the
way around. I'm pulling the top edge out and pushing the bottom edge under.
This is going to allow me to have thinner edges and also to make sure that
my shape is not perfectly around. Nothing in nature is ever perfectly
round.
Now a key force in Cymbidium orchid petals is that they have a tip, a
pointed tip at the end. So I'm going to hold the petal in between my two
fingers and pinch so that I can make a point. I'm taking that round petal
and pinching it, so I can make a point on the top. I'm going to turn my
petal upside down onto my veiner. This veiner was made from a rose petal
that we press into food grade silicone. You can though just buy a veiner
specifically made for an orchid. I'm going to work on the edges, first
pressing down, and I press in so that my fingers are half on the petal and
half off the petal. I don't want my fingers to just be all the way on the
petal, I'll never get the edges very thin.
So if I press all the way down, once I have the edges nice and thin, I want
to set the shape of my petal. In this case, I want to make a nice wide
petal shape. Beginner sugar flower makers tend to make their petals too
long. I'm going to make sure that it's nice and wide. Once I have pressed
all over my petal, I can pick it up and see all of the veins that I've put
on there.
Now, if I were to leave this petal in my hand to dry, it would dry flat,
and nothing in nature is ever perfectly flat and specifically orchid petals
are nice and cupped. So I'm going to place them in a spoon to dry
overnight. This will allow them to curve both up and down and left and
right. Leave the petal; we need five of them for each orchid that we're
going to be making. We're going to leave our five petals in our spoons to
dry overnight. Once we have all of the pieces dry, we'll be ready to
assemble.
- Category
- Health
Sign in or sign up to post comments.
Be the first to comment
Up Next
Autoplay
-
01:39

How to Paint Orchid Petals | Sugar Flowers
-
01:54
You Know What's Better Than Flowers? A Cupcake Bouquet! Here’s How to Make One
-
02:52
How to Add Outer Petals to a Rose | Sugar Flowers
-
02:05
How to Add Outer Labellum to Orchid | Sugar Flowers
-
02:39
How to Add Third Layer of Rose Petals | Sugar Flowers
-
01:57
About Cake Designer Amy Noelle | Sugar Flowers
-
02:00
How to Paint a Peony | Sugar Flowers
-
03:57
How to Add Petals to Rose Bud | Sugar Flowers
-
01:45
How to Make an Orchid Center Column | Sugar Flowers
-
00:31
How to Make Flowers
-
01:22
How to Make a Rose Center | Sugar Flowers
-
01:31
How to Make a Magnolia Center | Sugar Flowers
-
13:21
16 LOVELY DIY FLOWERS YOU'LL WANT TO MAKE RIGHT NOW
-
11:48
18 EASY-TO-MAKE DIY FLOWERS
-
02:30
How to Attach Orchid Petals | Sugar Flowers
-
02:55
How to Make Magnolia Petals | Sugar Flowers
-
01:48
How to Paint a Rose | Sugar Flowers
-
03:50
How to Arrange Sugar Flowers on Cakes | Sugar Flowers
-
02:01
How to Make Painted Buttercream Flowers | VIV'S TIPS
-
03:32
How to Add First Petal Layers to Rose | Sugar Flowers
-
13:35
20 DIY FLOWERS THAT ARE SO EASY TO MAKE
-
03:07
How to Paint & Assemble a Magnolia | Sugar Flowers