Published
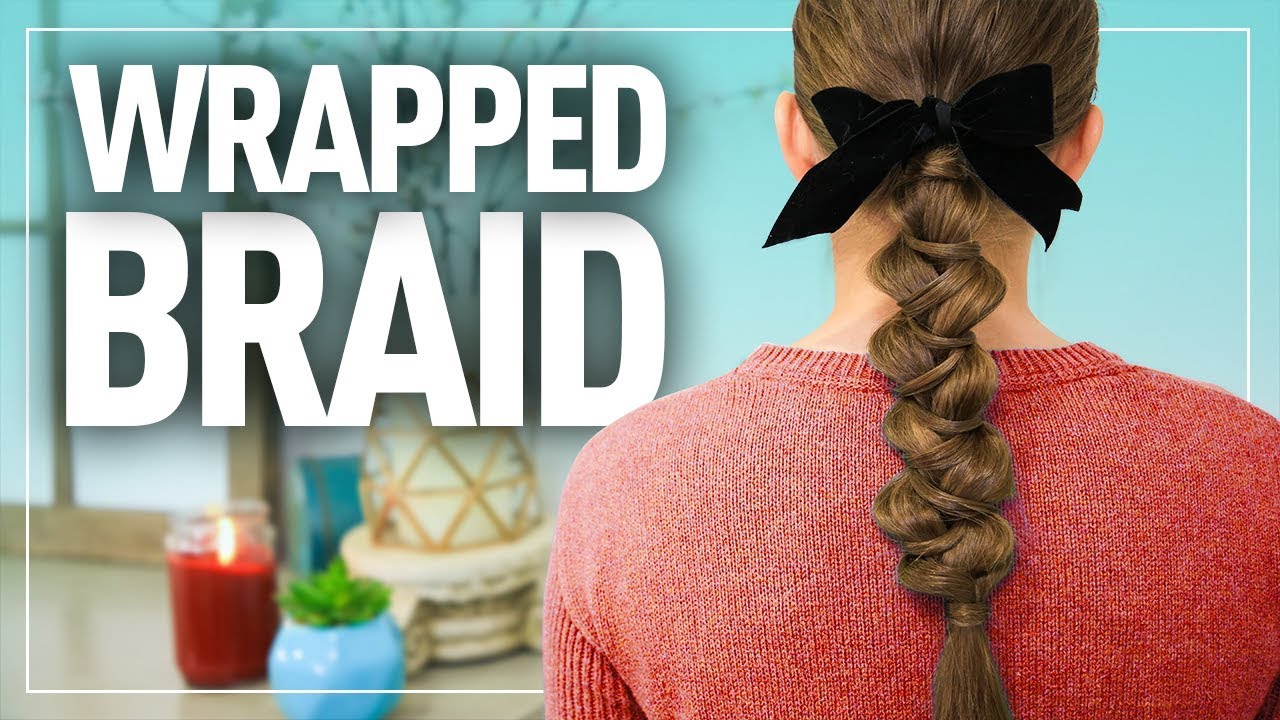
In today’s #hairstyle #tutorial, I am showing you guys how to complete a wrapped braid! I think that my favorite thing about this look is how versatile it is. You can dress it up or down, depending on how you choose to accessorize the braid! We went for a more mature look, making the #braid look super fluffy and finishing it off with an adorable velvet ribbon. If you wanted it to look a little bit more casual, you could place a scrunchie around the top, or just leave the hair tie exposed. This is such a great style for school, and anytime that I can achieve a look that’s this darling in less than 10 minutes, sign me up!
To see your own photo recreations of this style featured in our CGH app, feel free to tag your photos on IG with: #CGHWrappedBraid
This look was inspired by Chikas Chic, check out their instagram HERE ➡️
Items Needed: Hair tie, clear elastic, bobby pins, desired accessories (ribbon, scrunchies, etc)
Time Requirement: 5-10 minutes
Skill Level: Easy
Step 1: Pull hair into low ponytail.
Step 2: Separate ponytail into 3 even sections.
Step 3: Cross left section over the middle piece.
Step 4: Take a smaller piece from the same left section and loop it around the ponytail, and then place it back into its original section.
Step 5: Cross the right section over next, and repeat step 4. Continue all the way down the braid.
Step 6: Once you have completed the braid, go in and pancake the hair. (Meaning, tug on the sections of the braid above the zig zags to make the braid look fuller.
Step 7: Secure braid with an elastic.
Step 8: Using a bobby pin, secure any stray pieces of hair into place.
Step 9: To finish off the look, add any accessories to the braid. We chose a velvet ribbon, but you could also try a scrunchie for a more casual look!
Please be sure to click the "
- Category
- Fashion & Beauty
Sign in or sign up to post comments.
Be the first to comment
Up Next
Autoplay
-
12:22

What I Got for Christmas 2023 | ft Rylan McKnight
-
09:37
mcKnight family halloween 2023
-
01:47
THANK YOU for 13 YEARS on YOUTUBE! ???? | Cute Girls Hairstyles by Mindy McKnight
-
06:09
73 Questions with Mindy McKnight | VOGUE Format *never answered before*
-
05:24
Interview with Breville's Phil McKnight
-
06:53
How To: Pull-Through Braid | Easy Braid Hairstyle
-
04:04
Spiral Braid (The New 3 Strand Braid)
-
11:49
McKnight Family HALLOWEEN 2020 | Behind the Braids Ep. 131
-
05:23
How to Create Triple Flip Flip’s | by Mindy McKnight
-
04:06
Edgy French Braid Tutorial | how to braid | Braidsandstyles12
-
03:04
How To: EASY Fishtail Braid Tutorial For Beginners For College, Work | Fishtail Braid Hairstyle
-
03:18
EASY FALL HAIRSTYLE! WRAPPED 3 STRAND SIDE BRAID - MEDIUM & LONG HAIRSTYLE!
-
08:02
Dutch Braids into Twisty Buns | Cute Girls Hairstyles (by Brooklyn McKnight)
-
08:01
Come on Spring Break with Us! 30A Beach AirBnB Tour | Mindy McKnight
-
08:01
come on a florida airbnb tour with me | mindy mcknight
-
06:24
DUTCH BRAID VS FRENCH BRAID! HOW TO BRAID ON YOUR OWN HAIR! Short, Medium, & Long Hair
-
05:06
Follow Me SPRING BREAK Airbnb House Tour | Mindy McKnight
-
06:15
How to Create a Banded Ponytail | by Mindy McKnight
-
06:34
How to Do a Fishtail Braid | Braid Tutorials
-
09:26
Tips for SURVIVING Road Trips with KIDS & TEENS | Mindy McKnight
-
03:14
Big French Braid (Elsa Braid)
-
03:40
Cascading Waterfall Braid | Waterfall Braid Hairstyles | Braidsandstyles12